
Draw the bill-less crown and independent flap roots
Mark the left ear flap, right ear flap and forehead turn-up flap as three distinct components attached to a sewn crown. Show the root of each ear flap from the side and rear, including the transition into rear coverage. The forehead piece turns against the front of the crown; it is not a short visor. Keep a front view with both long flaps visible so a forward brim cannot enter the brief unnoticed.
Identify the reference that controls this assembly. FORMBRIM’s brimmed fold-down earflap cap uses a continuous side-and-rear band and a forward bill. That earlier construction does not provide the pattern for these independent long flaps. Likewise, a sun-hat neck cape describes a different attachment and coverage shape. Use those references only for clearly named secondary details, never as interchangeable trapper shells.
Give each attachment a stable name on the drawing and sample comments. Review left and right positions on the same worn reference, with the crown seated consistently. If one flap looks lower, determine whether the issue is its root position, its cut length or the crown’s position before requesting a general size change. Keep the forehead flap outline and turn-up attachment in the same record.
Trace the shell, facing and turned edges
The development reference pairs a graphite woven outer shell with a smooth light gray contact facing. It does not show pile, fur or an added insulation layer. Ask for identified material proposals with composition, weight, finish and hand for both faces. Agree whether the chosen materials suit the required assembly and finishing rather than treating a light inside color as evidence of a particular fiber or thermal property.
Follow the facing from the crown into each ear flap and the separate forehead piece. Inspect the root joins, turned edges and places where several layers meet. Record exposed edges, local bulk or a facing that pulls the flap outline out of agreement with the drawing. Review the outside and inside of the same sample; a neat crown exterior does not approve an unseen ear-flap attachment.
When comparing alternatives, keep the flap shape and connection proposal fixed where practical. Changing the facing, edge treatment and flap length at once makes the useful revision harder to identify. State which surface should contact the wearer and which should remain visible in the agreed presentation. Any warmth, weather or other measured requirement needs its own specification and evidence; this appearance review does not supply it.
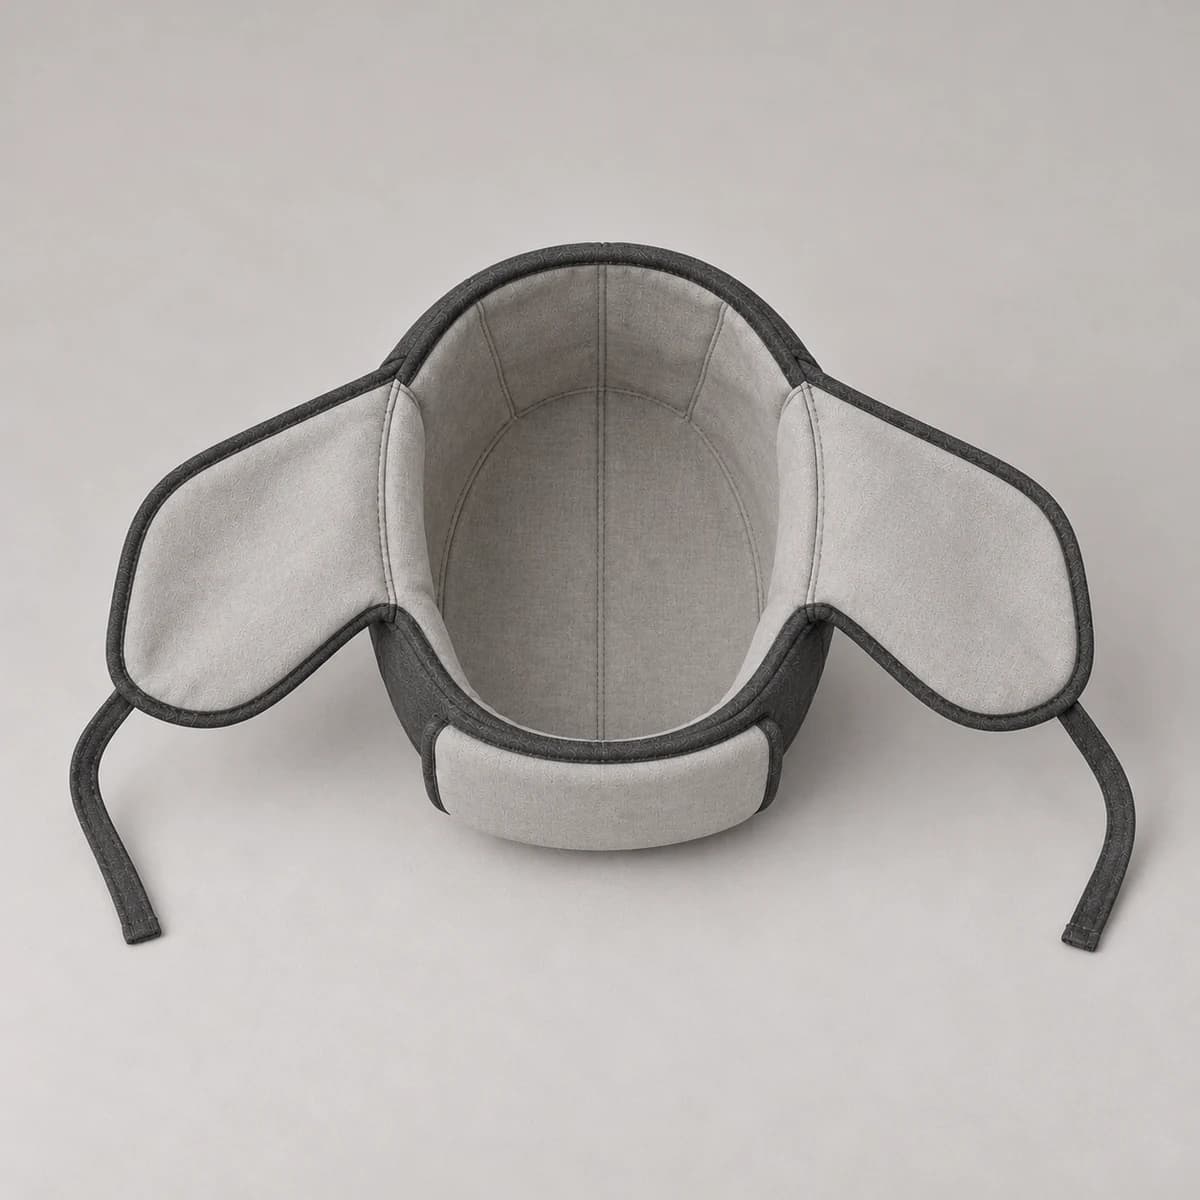
The smooth facing, turned edges and root joins remain sample-review decisions.
Inspect the physical sample before approval.Review both tie ends as one connection
The illustrated connection proposal uses a narrow tie made from the shell fabric at the lower end of each ear flap. View both ends together. Mark where each tie attaches, how its edge is finished and how the attachment appears on the facing side. The tie is a development option to assess, not a fixed order specification or proof that the illustrated dimensions suit an intended wearer.
Review the connection with the crown in its agreed worn position. Record ear-flap reach, the intended connection position and the handling the buyer wants to discuss. Separate a flap that needs a different length from a tie that needs a different attachment or usable length. Do not correct an unclear fit comment by silently changing every part of the assembly. Keep the two sides matched to one identified sample revision.
If another closure is requested, identify it as a new feasibility question. Supply its intended position and handling requirements; review the resulting flap ends, contact areas and packing again. Do not insert a buckle, snap or cord into one view while leaving the other views on the fabric-tie proposal. The assembly drawing, sample photographs and written component list must describe the same connection.
Approve decoration and the complete handoff
Give each proposed mark its finished dimensions and distances from the forehead flap edge, flap root or crown seam that controls placement. Show which side is visible when the forehead flap is turned up. If the design uses an inside label, inspect its attachment against the agreed facing. A decoration file does not approve the surrounding flap shape or its join.
Review the bill-less silhouette, independent roots, facing, edge finish and both connection ends together before closing the sample comments. Assign accepted, revise or pending status to each item and identify the current drawing, material submissions and artwork revision. A changed facing or tie attachment can reopen a local finish decision even when the front outline appears unchanged.
State how the long ear flaps and ties should sit in the proposed packing, then inspect the unpacked sample and forehead turn-up again. For the quote, list finished styles, colorways, proposed sizes, labels, artwork and destination. FORMBRIM’s bulk minimum is 300 pieces per style, per color. Keep sample scope and size allocation separate, and allow review, revisions and transport in the arrival plan. No stock model, tested thermal result or previous customer order is implied by this development reference.
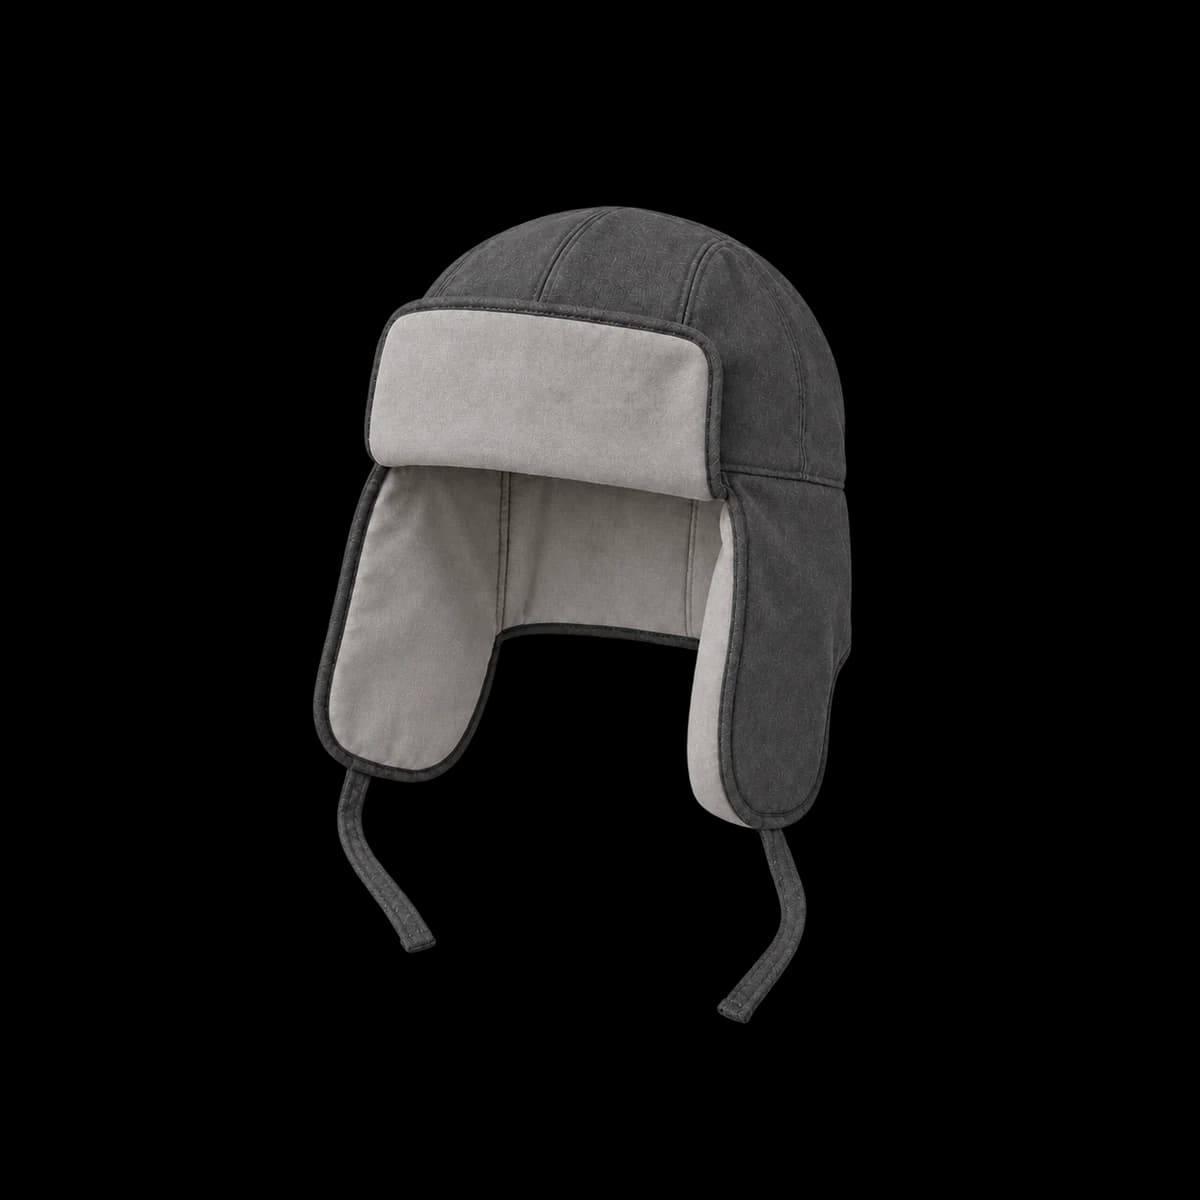
The forehead flap and two independent long ear flaps define this bill-less proposal.
Inspect the physical sample before approval.A practical buying example
Suppose the crown position and left ear-flap reach are accepted, but the right tie attachment feels bulky against the smooth facing. Mark the attachment and inside edge on matching views, then request a local construction proposal while keeping the approved crown and flap lengths fixed. Review both tie ends again after that change. Shortening both ear flaps would answer a different question, and substituting a buckle in one photograph would leave the connection unresolved. This example explains how to isolate feedback; it is not a measured result or a previously completed order.
Questions to settle before requesting a sample
Ask which drawing identifies each independent flap root, what the proposed shell and contact-facing submissions are, and how both fabric ties will be attached and finished. Establish the intended worn and packing positions before comparing samples. Confirm which surface of the forehead flap carries the artwork and inspect its reverse attachment. If a different closure or facing is requested, keep it open for feasibility review and name the affected joins that need reassessment. Carry unresolved performance requests separately; neither the trapper name nor the light gray facing establishes a thermal or weather result.